i4Q Services for Data Analytics
General Description
The i4Q Services for Data Analytics (i4QDA) solution aims to provide a Data Analytics experimentation environment that allows the creation of data analytics workflows in a dynamic way. This solution enables the creation of AI workflows in a simple and intuitive, code-free manner, building the workflow using a visual programming environment to place the components through drag-and-drop interface. The i4QDA solution is supported by Apache Airflow, a workflow orchestrator, which is used to create, schedule and monitor workflows, meaning it oversees the handling of execution, orchestration, management and storage of these workflows, and implements a number of operators and technologies that are used in the creation of these workflows, such as databases, machine learning libraries and platforms, among many other technologies.
Features
The i4QDA solution comprises four major components. The first one is the Apache Airflow platform, responsible for the orchestration of the workflows, meaning the scheduling, execution, monitoring and storage of the workflows. The second component is the set of supporting technologies, which encompasses all the necessary supporting technologies for workflow creation, as well as AI, Data Analytics and machine learning algorithms. The third component is the set of operators (connectors, transformers and analytics) used to create workflows, and finally, the last component is the i4QDA User Interface (UI), which guides users through the dynamic definition of workflows, by enabling the creation of workflows that can connect to data sources (data source configuration, connection and storage), perform data preparation and pre-processing (data filtering, aggregation, harmonisation and semantic enrichment) and apply AI methods for AI model training, updating and serving and Data Analytics (selection and configuration of AI methods). This last component has the following specific features, that allow the dynamic creation of workflows:
Creation of Data Analytics Workflows: Visual programming of AI workflows, by using the drag and drop functionality to add operators and setting up dependencies between operators.
Save and Load Workflows: Allows the saving of workflows in a database, so that it can be loaded and executed anytime, and allowing the user to make changes to previously done workflows.
Creation and integration of new operators: The creation of user specific operators, through the help of guidelines, and integration of those specific on the workflow creation tool.
Configuration of external tools and technologies: Full integration with tools and technologies, like Keras, Tensorflow, Sklearn, allowing an all-in-one box setting.
Execution and orchestration of workflows: Easy plug’n’play of user created workflows directly on the Airflow interface, allowing the execution and orchestration of multiple workflows.
ScreenShots
Comercial Information
Authors
Company |
Website |
Logo |
|---|---|---|
UNINOVA |

|
|
KNOWLEDGEBIZ |

|
|
IKERLAN |

|
|
ENGINEERING |

|
|
CERTH |

|
License
Apache License 2.0
Pricing
Subject |
Value |
|---|---|
Payment Model |
One-off |
Price |
0 € |
Associated i4Q Solutions
Required
No strict dependencies
Optional
i4Q Data Integration and Transformation
i4Q Data Repository
i4Q Analytics Dashboard
System Requirements
Docker Engine
Docker-compose
RAM >= 16GB
Processor: Intel(R) Core(TM) i5-6500 or greater / AMD Ryzen 5 3600 or greater
Installation Guidelines
Resource |
Location |
|---|---|
Last release (v.1.0.0) |
Installation
This section provides all the necessary steps for the installation of the i4Q DA tool
The first step is the installation of Docker Engine and docker-compose to run the containers
The second step is to clone the repository for the i4QDA solution
The final steps are the build and initialization of the docker image. To do that you need to go to directory of the project and execute the following commands:
$ cd ./{cloned_directory}$ docker-compose build
And when the build is finished run this command to initialize the containers
$ docker-compose up
To stop the containers, use the following command
$ docker-compose stop
User Manual
User creation
To create a new user to access the workflow creator, first the user needs to go to the home page through the link localhost:3000, where the user will be greeted by the following image:

After that, the user needs to press the “Register” option, which will redirect to the user creation page (see image bellow).

Fill in the fields with the necessary information, and when that its done press the “Register Account” option. An email will be sent to user saying that the account as been created and activated (it may take some time since the account needs to be activated by an admin)
Workflow Creation
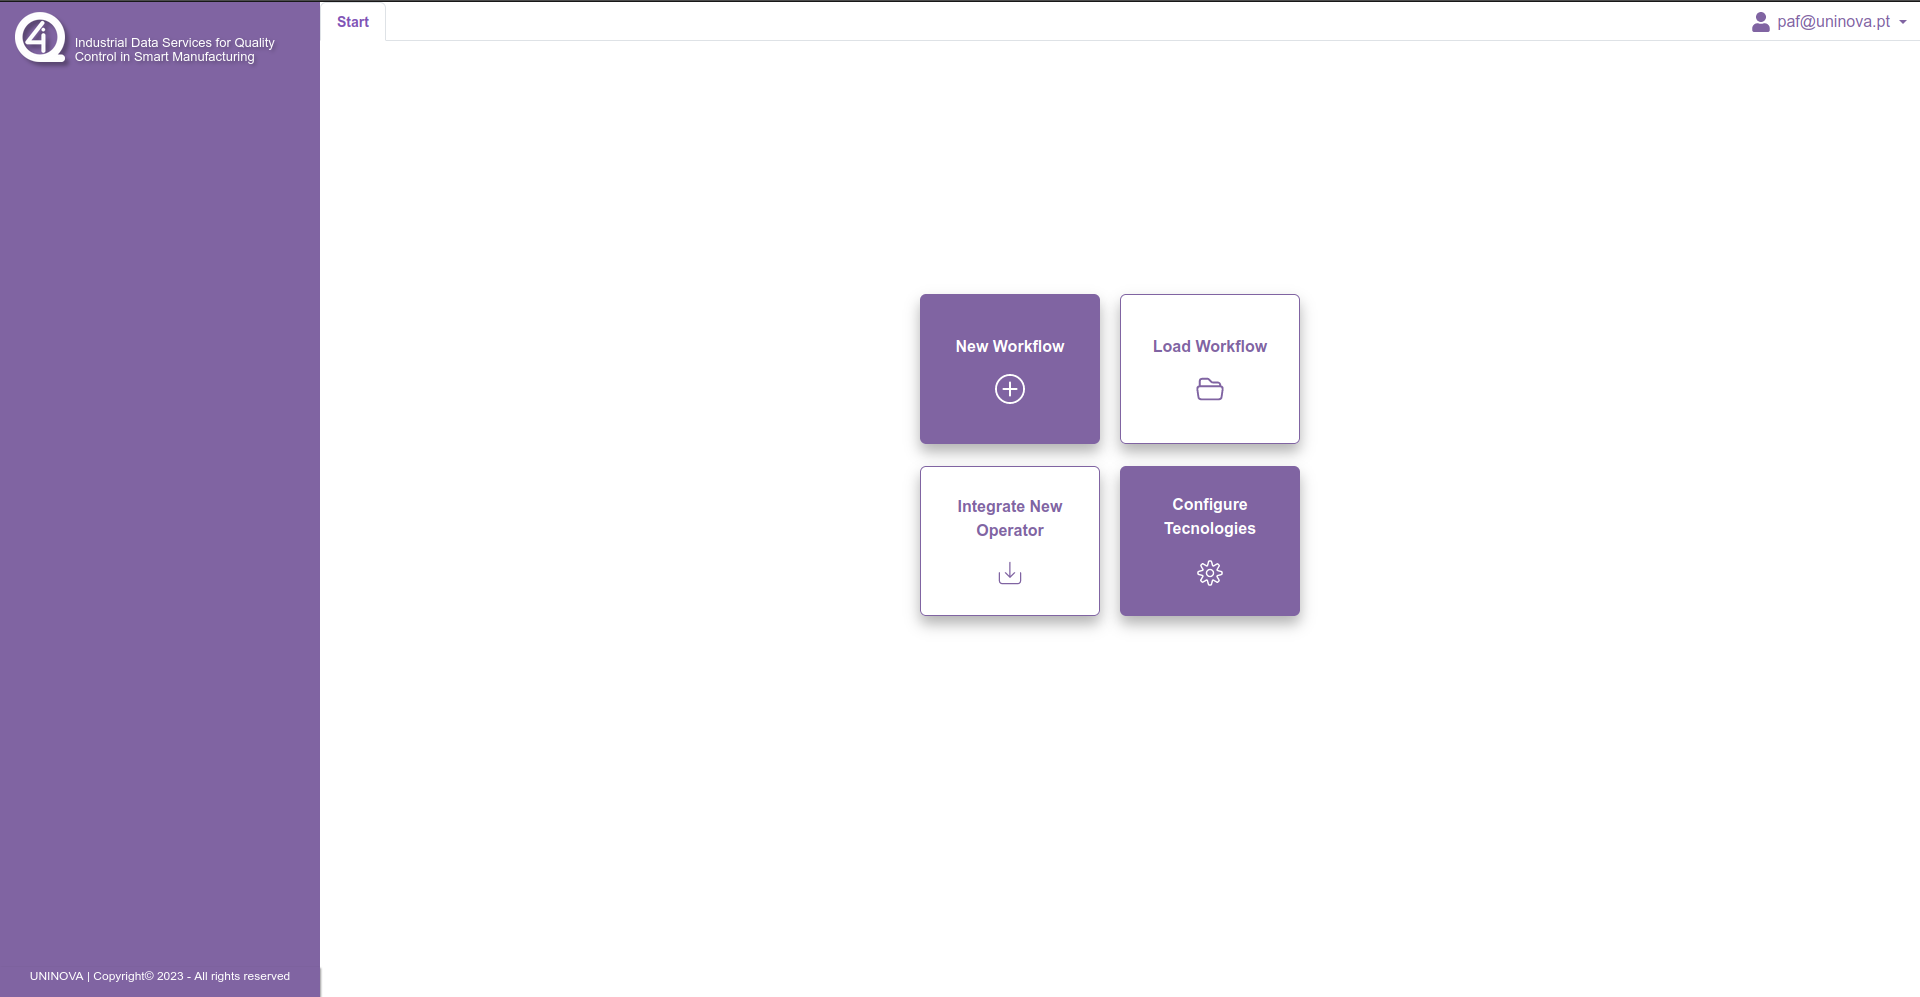
To start a workflow creation, the user needs to open a web browser of his choice and enter the following link localhost:3000. After login in, the user will be redirected to the following page:
To start a new workflow, first the user must click on the option “New Workflow”, which then will prompt the user to insert a name for the workflow, like it is shown in the following window:
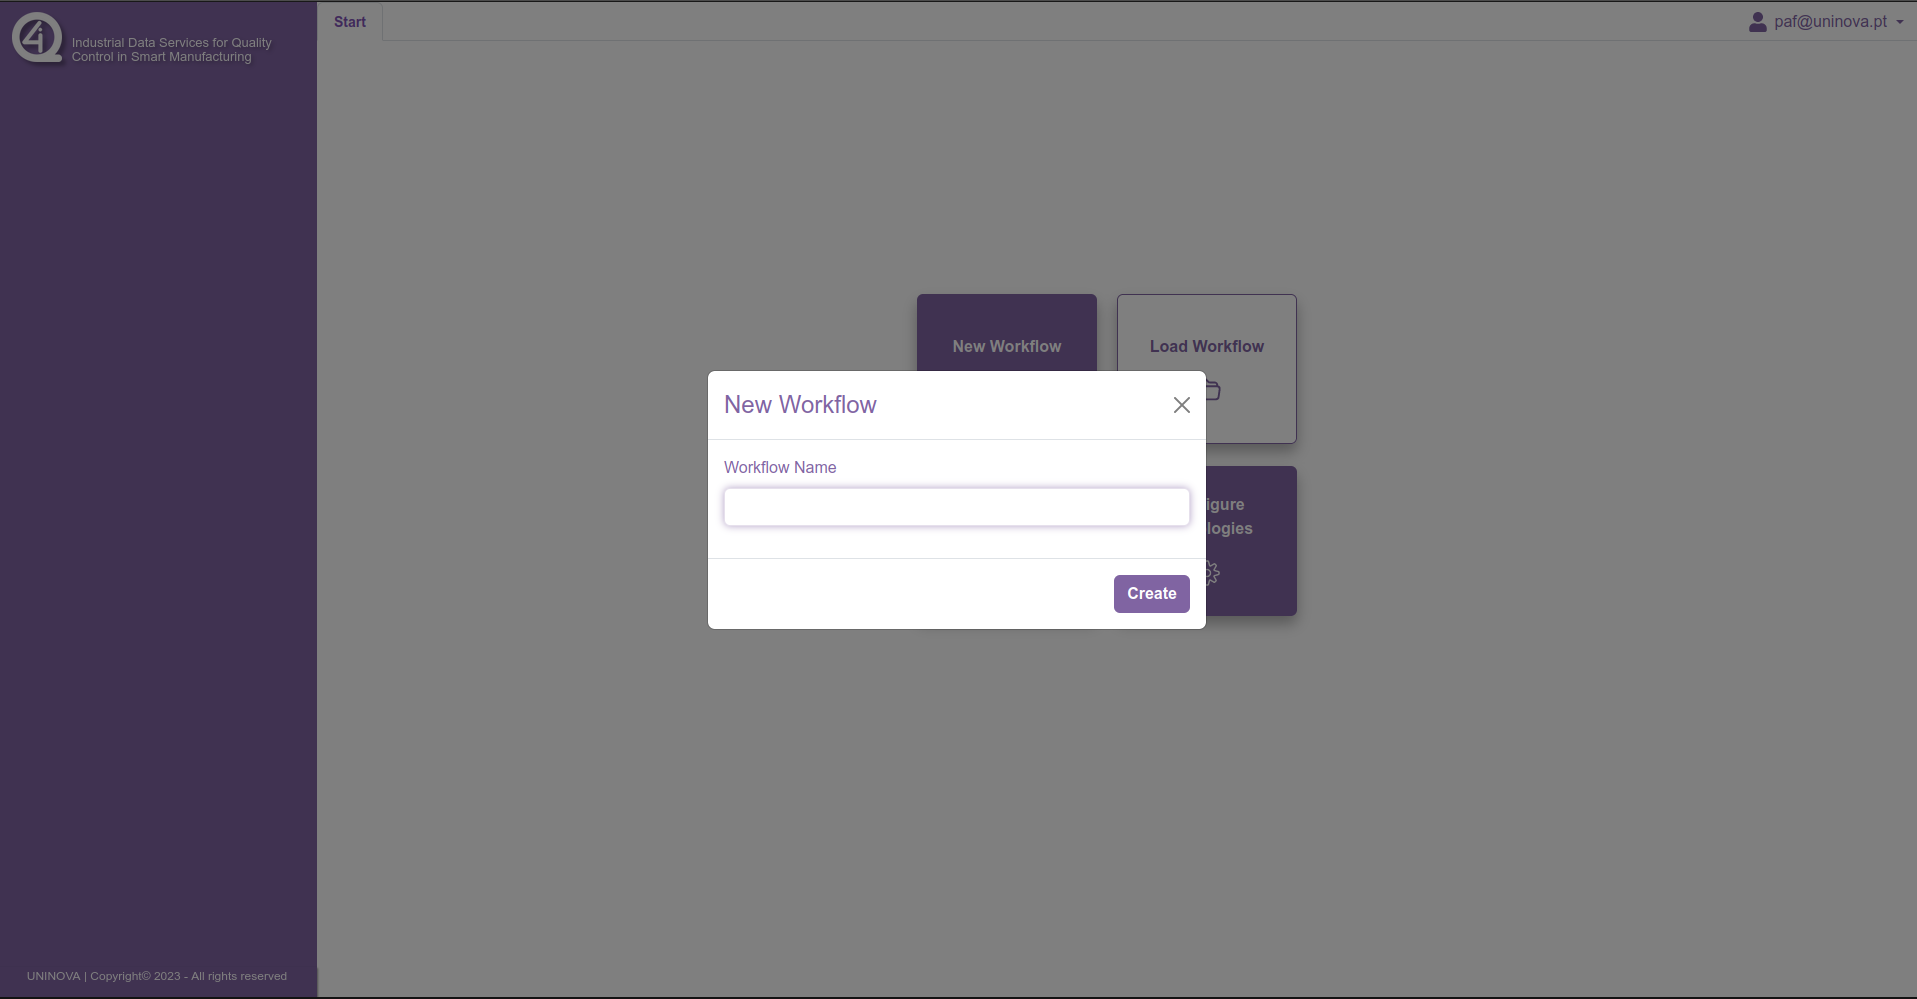
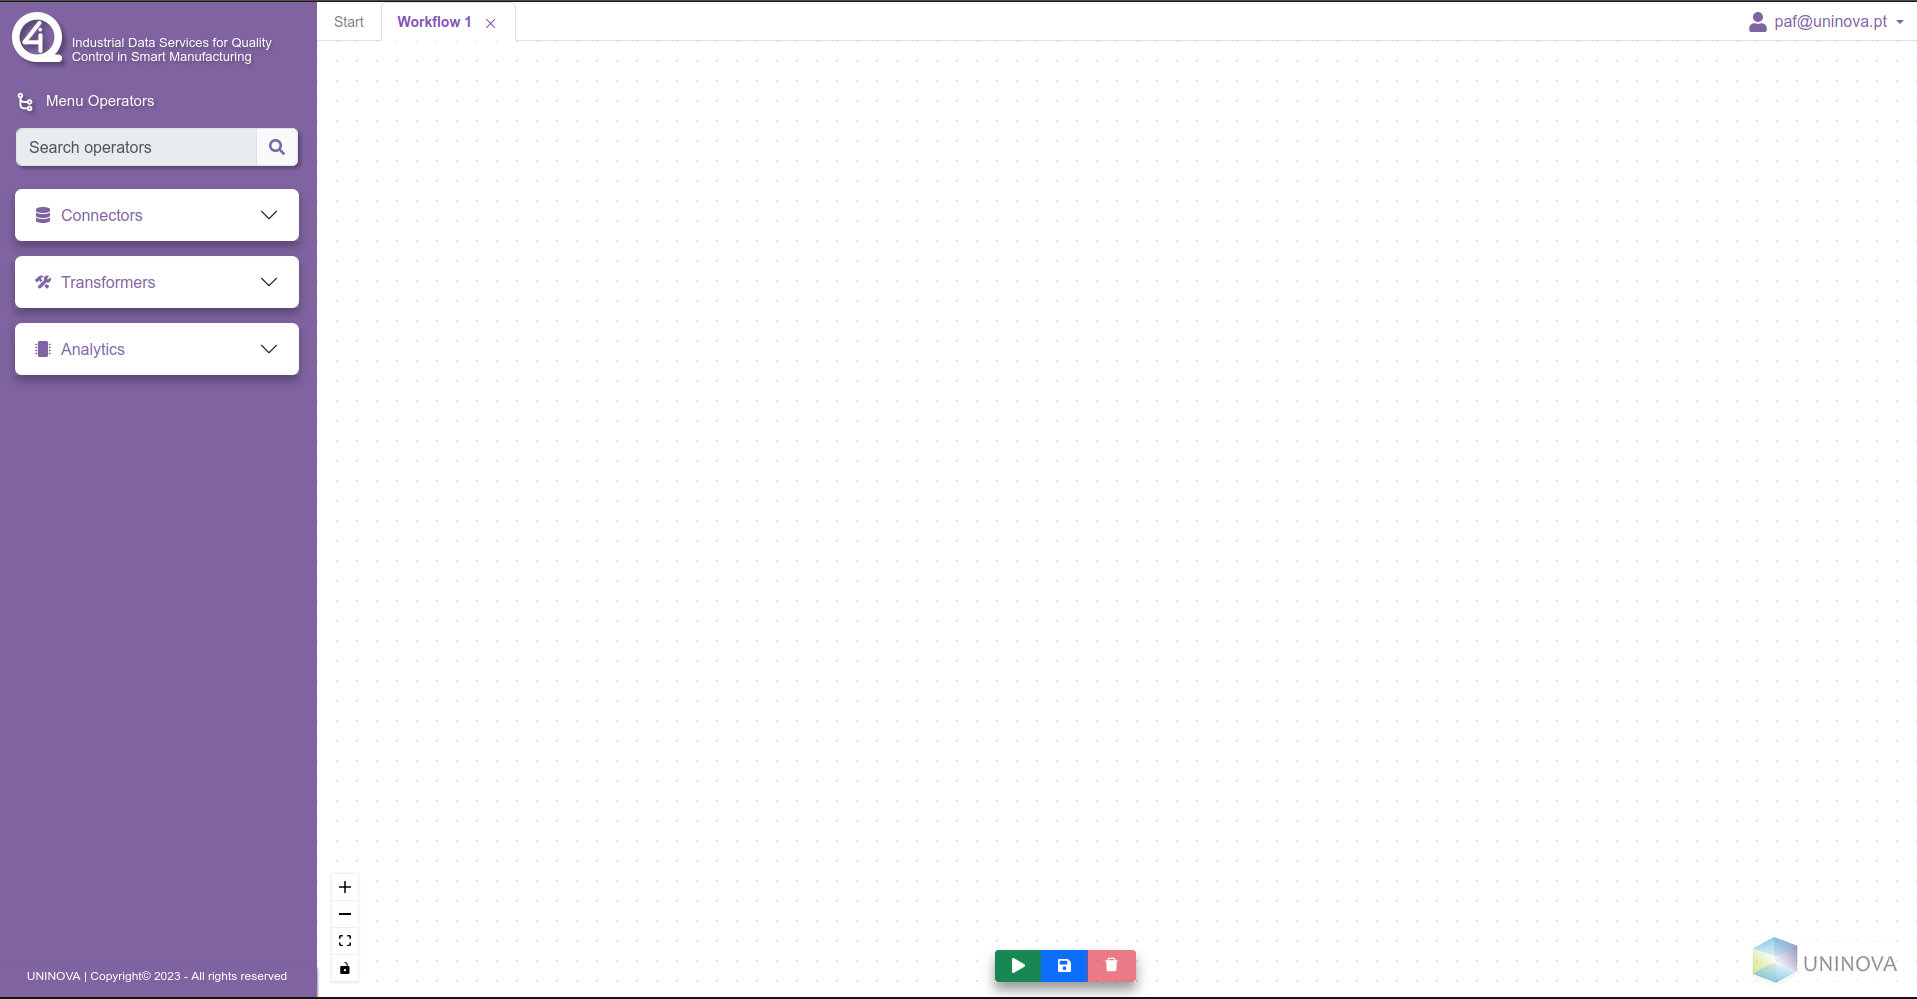
After filling in the box with a valid workflow name and clicking on the “create” button, then a new tab will be added on the header component, and the workspace will have a blank canvas where the operators can be added. On the sidebar, three dropdown menus will appear, which contain all the operators available, divided between them. This can be seen in the figure bellow.
To start the workflow definition, the operators can be drag-n-dropped into the canvas, where a similar prompt will ask the user to insert a name for the operator (see next figure).
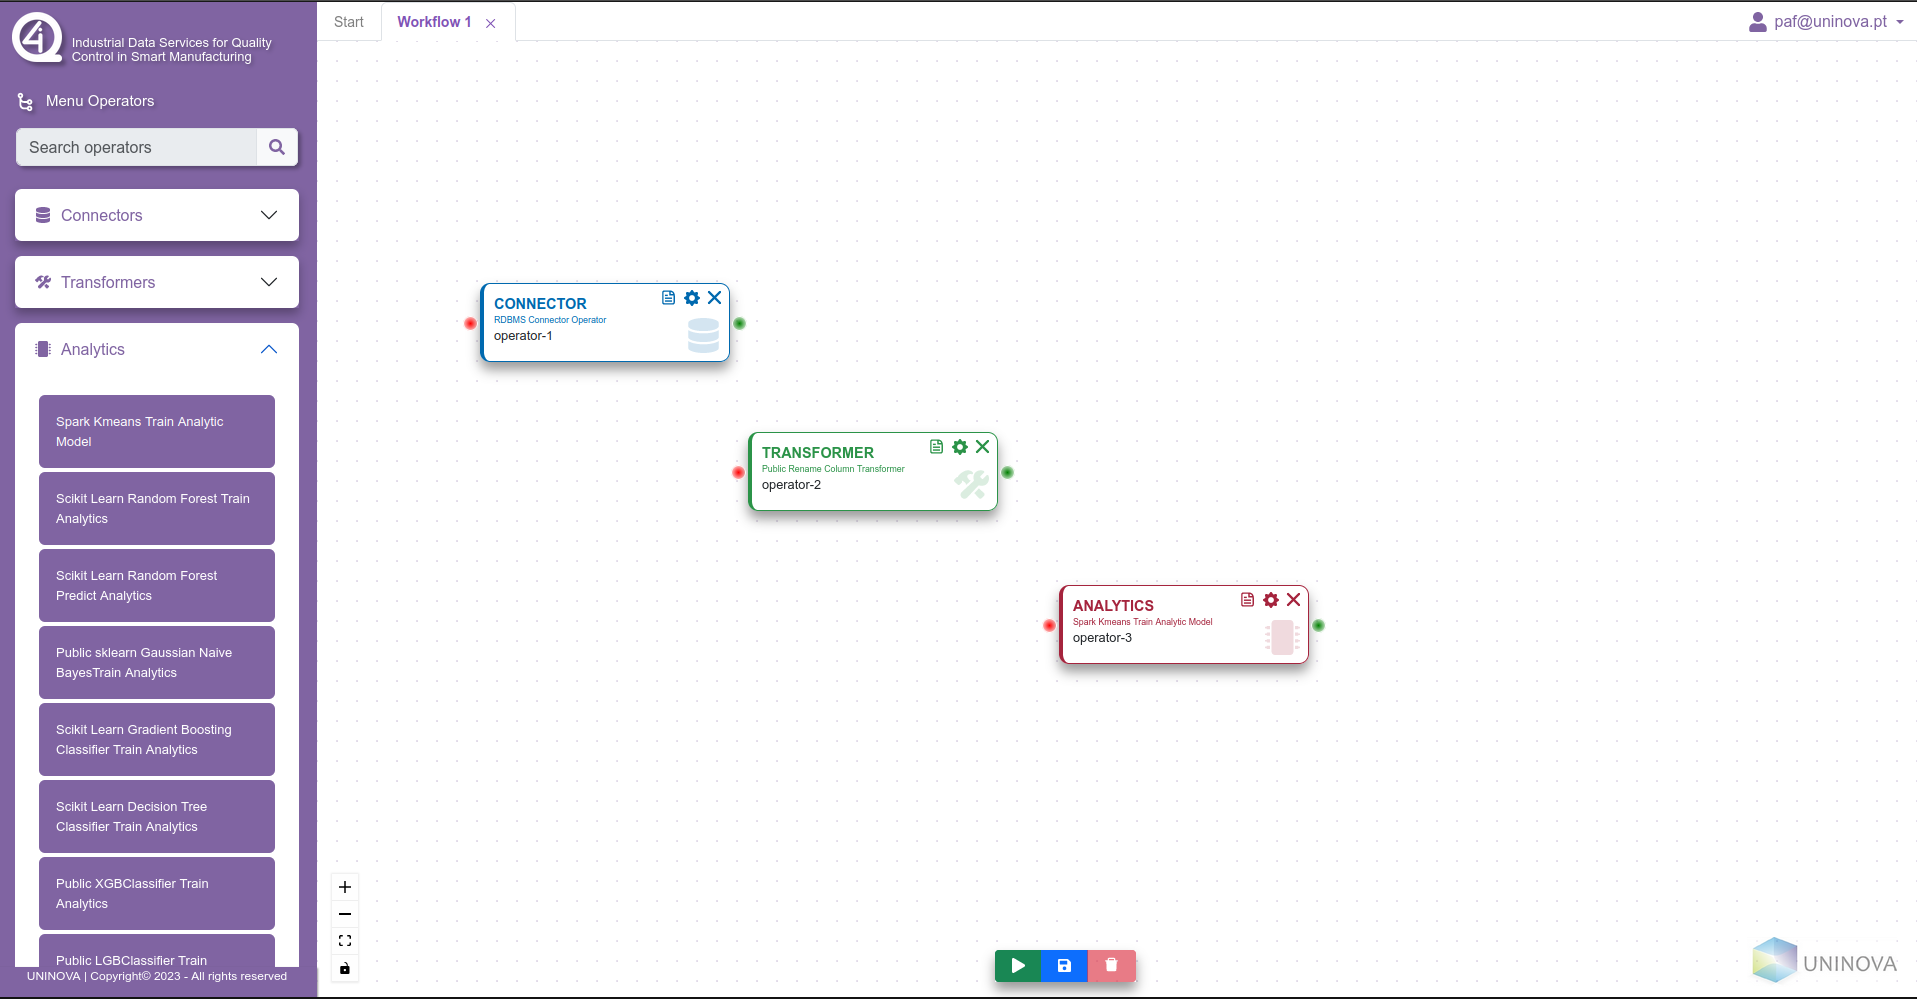
Each operator is colour coded regarding their category, where blue operators are blue, transformers are green, and analytics are red.
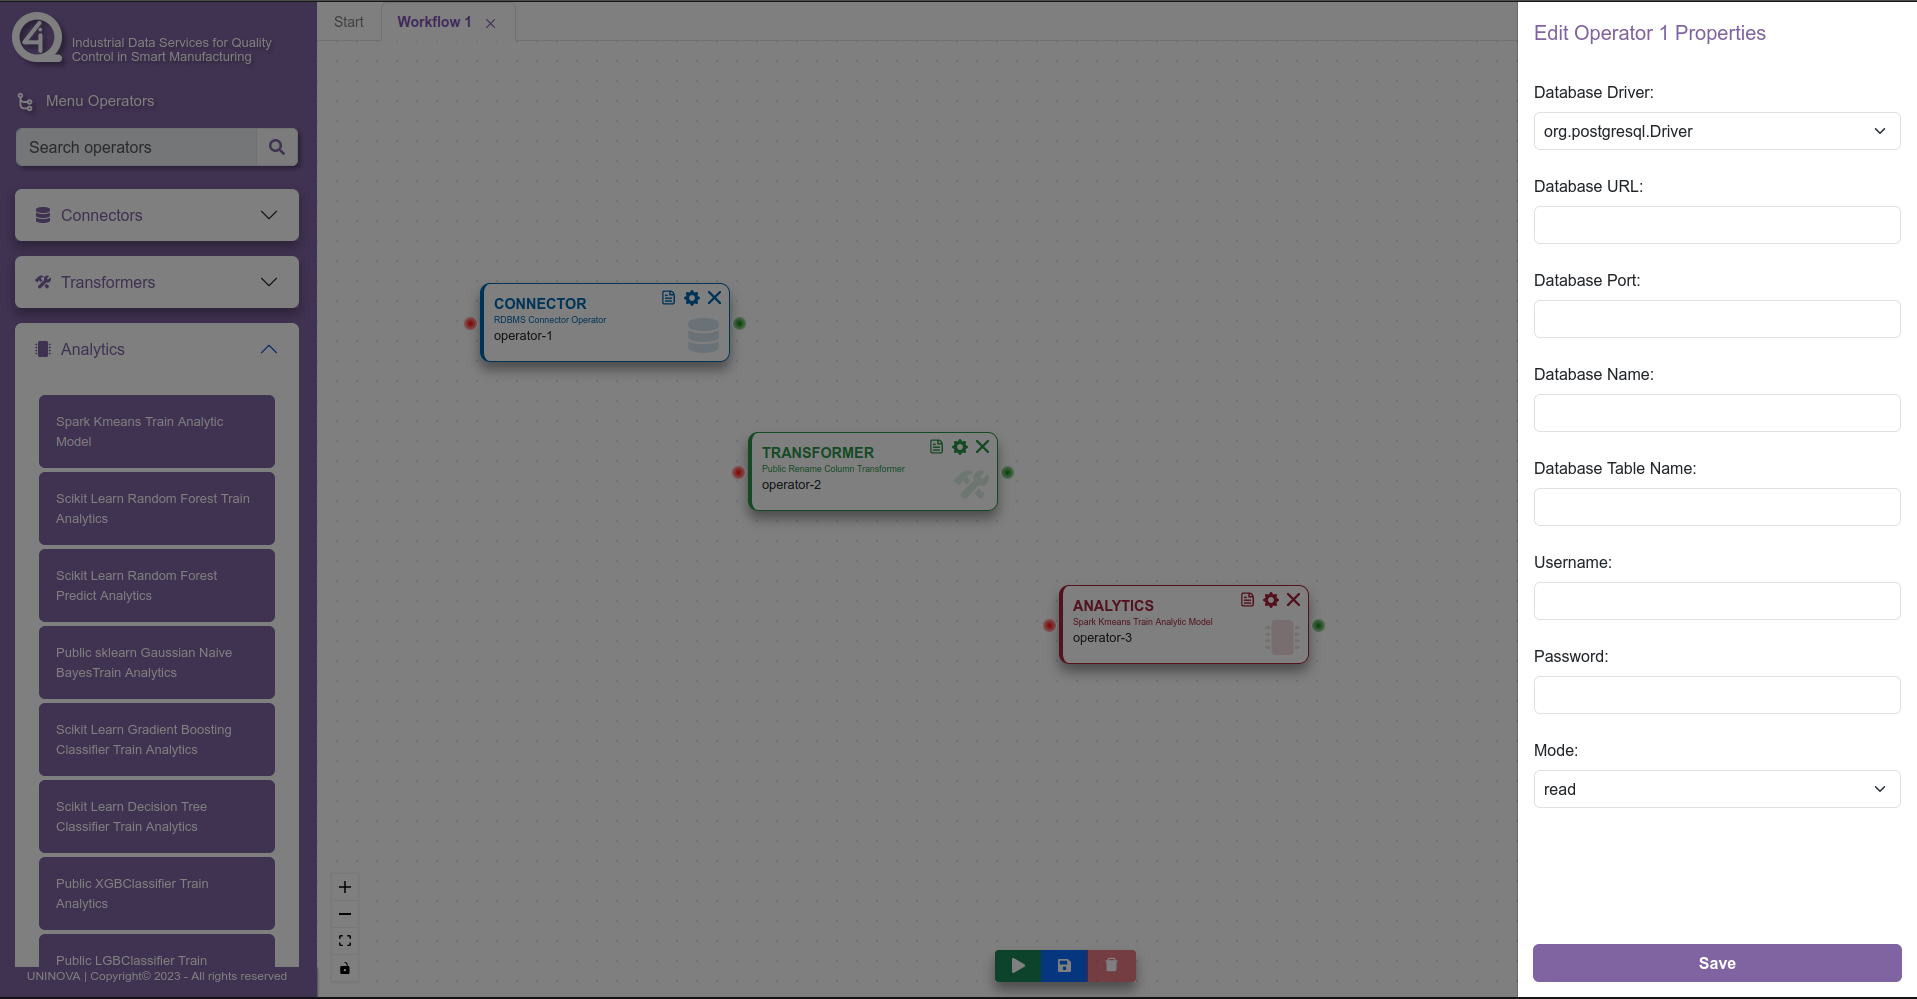
When multiple operators are added to the canvas, the user can then start editing the properties of these said operators, and also can start connecting them between themselves, in order to create the flow of data, from the data collection/ingestion to the model training/serving. To edit the properties of an operator, the user clicks on the cog wheel symbol on the operator box, which will open a side menu on the right side, with all the fields that the operator needs to have filled in. This can be seen in the next figure.
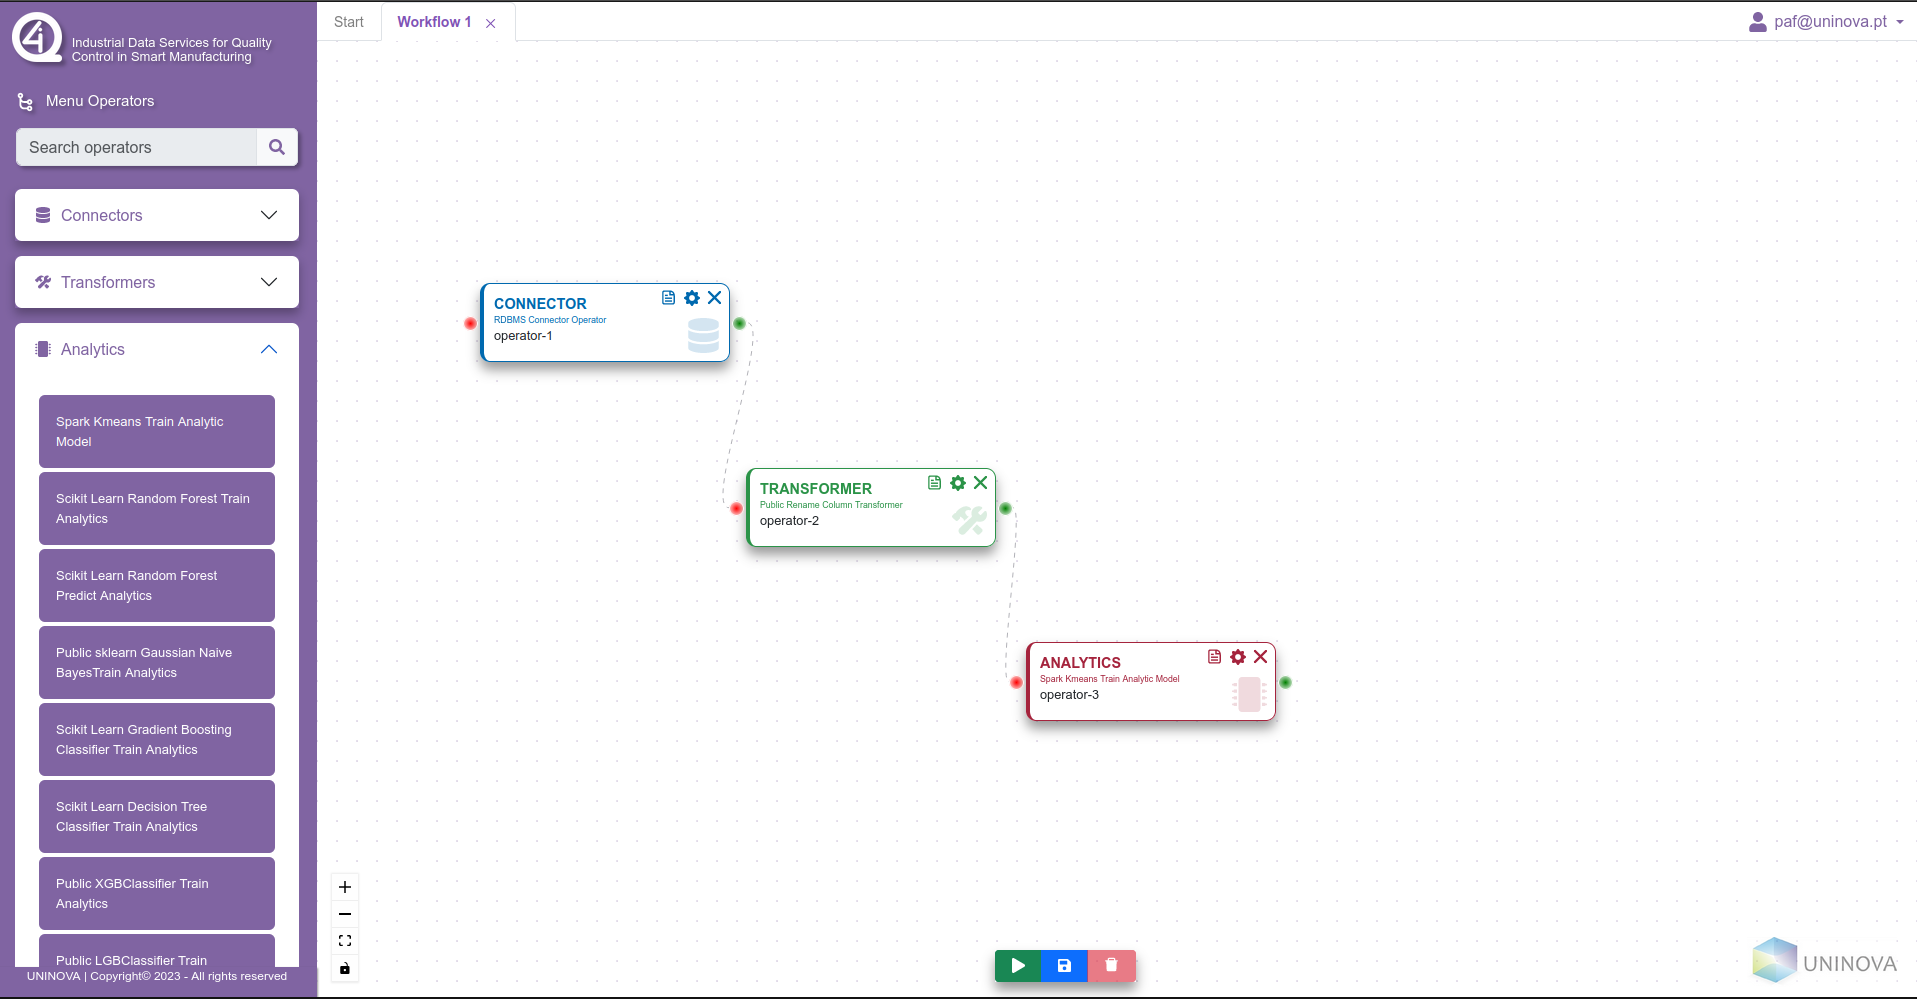
After saving, the user can then start connecting the operators, by clicking on the green circle on the right of the operator, and dragging and clicking the connection to a red circle from another operator (see next figure).
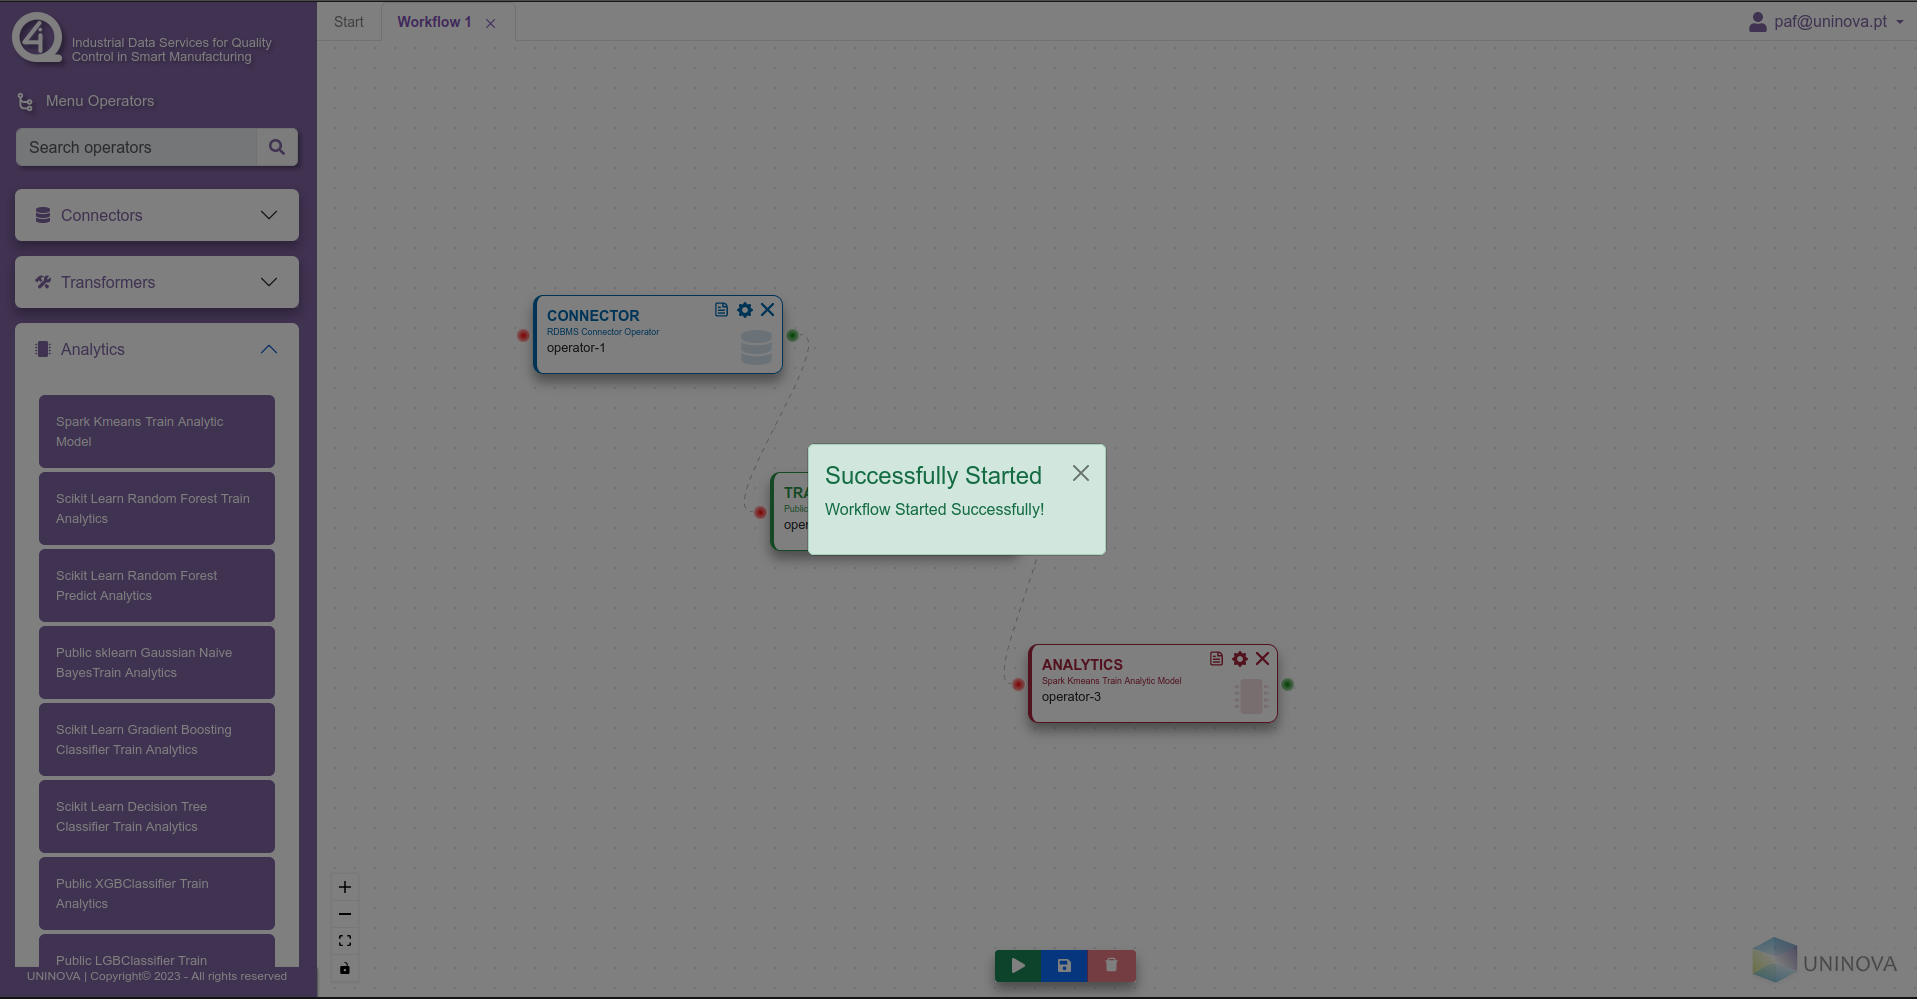
Finally, when all the steps above are completed, the user can then click on the green play button on the bottom of the window, which will initialize the workflow and prepare it to be executed in Airflow.
Saving/Loading Workflow
To save a workflow the user needs only to, at any stage of the workflow creation, to click on the blue button with a disk icon. After saving the workflow, the user can return to the “start” page, by navigating through the tabs shown in the header component, where then he can select the “Load Workflow” option. If the user has any workflows that where stored previously, these will show in a list (see figure bellow), where the user selects which workflow to open to start editing.
Adding custom operators
To add a custom operator, the user select the “Integrate New Operator” option in the “start” menu, opening the following tab.

The user then needs to write a name for the operator to be added, along side the python script that corresponds to the task to be integrated, and the json containing the metadata for this operator.
Operators
The tool has 3 types of operators available for the creation of workflows. These are the:
Connectors
Transformers
Analytics
The connectors is a set of operators to access data sources, such as CSV files or RDBMS databases. The transformers are the operators that contain data manipulation processes, such as remove null values or filter by some parameter. The last group are the analytic operators, with algorithms for training AI/ML models, and applying previously trained models. The next sections contain a detailed description of how to use all available operators.
Connectors
Here is a table with all the available connector operators, alongside a description and what are the input parameters that the user needs to provide.
Operator |
Description |
Parameters |
|---|---|---|
RDBMS connector |
Loads the data from a RDBMS database into a Spark Dataframe |
|
|
||
|
||
|
||
|
||
|
||
|
||
|
||
File connector |
Connector to a file (CSV). Currently only supports CSV and JSON file types |
|
|
||
|
||
CSV Folder connector |
Connector to a folder with many CSVs |
|
Transformers
Here is a table with all the available transformer operators, alongside a description and what are the input parameters that the user needs to provide. The names of the operators in this list are abreviated from the ones that apear in the user interface, where the full name corresponds to “Custom/Public {name of the operator} Transformer”.
Operator |
Description |
Parameters |
|---|---|---|
Preprocess Change Column Values |
Changes the values in a column to other user chosen values. Input from user needs to be in {key: value} format, where key is the value to be changed, and value is the new value |
|
|
||
Rename Column |
Changes the name of a column |
|
|
||
Convert Types |
Converts the type of the values in a column into another type |
|
|
||
Remove Columns |
Removes a set of columns from the dataset |
|
Select Columns |
Selects a set of columns from the dataset |
|
Filter Dataset |
Filters a columns based on a condition defined by the user |
|
|
||
|
||
Filter Missing Values |
|
|
|
||
Normalize Columns |
Normalizes the values in a set of columns |
|
Remove Duplicates |
Removes duplicate rows present in the dataset |
—- |
Replace Missing Values |
Replaces missing values with a value chosen by the user |
|
|
||
Aggregate Group By |
Aggregates data based on another column entries |
`` Aggregation Column``: Column name containing the aggregation fields |
` Type of operation`: List of the types of aggregation methods |
||
|
||
Label Encoder |
||
One Hot Encoder |
||
Replace Infinite Values |
||
Simple Query |
Allows the application of simple queries over the data |
|
Analytics
Here is a table with all the available analytic operators, alongside a description and what are the input parameters that the user needs to provide. The names of the operators in this list are abreviated from the ones that apear in the user interface, where the full name corresponds to “{Technology} {name of the operator} Analytics”.
Operator |
Description |
Parameters |
|---|---|---|
Random Forest Train |
Trains a Random Forest classification model. |
|
|
||
|
||
Random Forest Predict |
Performs predictions using a trained Random Forest model. |
|
Gaussian Naive Bayes Train |
Trains a Gaussian Naive Bayes |
|
|
||
Gradient Boosting Classifier Train |
Trains a Gradient Boosting Classifier model |
|
|
||
Decision Tree Classifier Train |
Trains a Decision Tree Classifier model |
|
|
||
XGB Classifier Train |
Trains a XGB Classifier model |
|
|
||
LGB Classifier Train |
Trains a XGB Classifier model |
|
|
||
Classifier Model Predictor |
Loads a classifier type model previously trained |
|
|
||
XGB Regressor Train |
Trains a XGB Regressor model |
|
|
||
LGBM Regressor Train |
Trains a XGBM Regressor model |
|
|
||
Gradient Boosting Regressor Train |
Trains a Gradient Boosting Regressor model |
|
|
||
Decision Tree Regressor Train |
Trains a Decision Tree Regressor model |
|
|
||
Linear Regression Train |
Trains a Linear Regression model |
|
|
||
Ridge Regression |
Trains a Ridge Regression model |
|
|
||
Lasso Regression |
Trains a Lasso Regression model |
|
|
||
Regression model Predictor |
Loads a Regression type model previously trained |
|
|